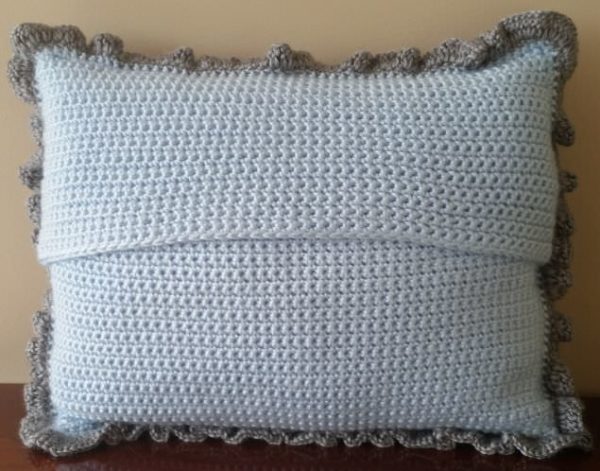
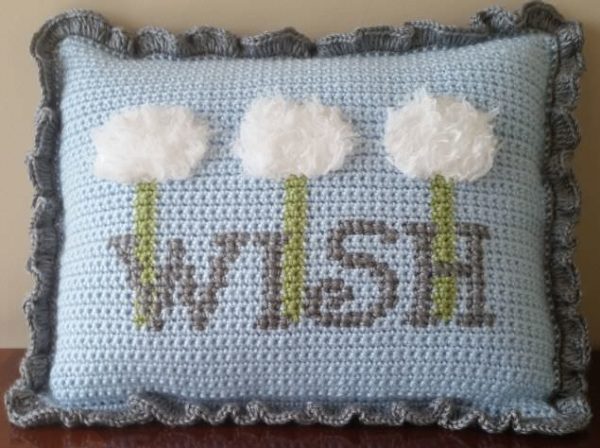
As a nod to the name of this blog, I’ve been wanting to make a dandelion crochet pillow for a while. It took a few attempts to get the ultimate design to match the picture I had in my head, but I can now share with you the Dandelion Wish Crochet Pillow! The pillow is made by first crocheting the dandelions on the front panel, then cross-stitching the lettering on top. A fuzzy yarn is used to make the “poof” of the dandelions and the pillow is finished with a ruffled border. If you are interested in making one of your own, read on!
PIN to your Pinterest boards HERE
ADD to your Ravelry que HERE
Dandelion Wish Crochet Pillow
Materials Used:
- 2 skeins Caron Simply Soft in Soft Blue
- Partial skein Caron Simply Soft in Grey Heather
- Partial skein Caron Simply Soft in Pistachio
- Partial skein Yarn Bee Snuggle Up in White
- H/8 – 5.00 mm crochet hook
- 12″ x 16″ pillow form
- Tapestry needle
Abbreviations:
ch(s) = chain(s)
st(s) = stitches(s)
sc = single crochet
dc = double crochet
sl st = slip stitch
American crochet terms used throughout
Gauge:
4″ x 4″ = 14 sc, 18 rows
Finished Size Approximately:
12″ x 16″
Note:
Your pre-assembled panels should be slightly smaller than the indicated finished size. They will stretch once the pillow form is inserted and this helps achieve a snug fit.

Instructions:
To make the front panel:
Row 1:
With soft blue, chain 55. Sc in the 2nd ch from the hook and in each ch across, turn.
Rows 2 – 53:
Follow the graph below (ignore the squares containing an “x”, this is where the cross-stitching will be added later). Each square on the graph represents 1 sc. Work the odd rows by reading the graph from right-to-left, the even rows by reading the graph from left-to-right, and so forth. Do not add in the additional colors until they are called for in the graph.
Use pistachio for the dandelion stems and white for the dandelion poof. Drop any color not in use behind the work and pick it back up when needed. The back side of this panel will look quite messy, but it does not matter because it will not be seen once the pillow is assembled. When you have completed the pattern on the graph, fasten off and weave in ends.
To add the cross-stitch lettering, thread a tapestry needle with a suitable length of grey heather yarn. Using the graph below as your guide, place cross-stitches into your crochet panel corresponding to the squares on the graph marked with an “x”. Once you have all the letters cross-stitched, outline them with a backstitch in the same color yarn. If you are not familiar with the technique of cross-stitch on crochet, Tamara Kelly of the Moogly blog has a great tutorial here.
Dandelion Wish Crochet Pillow Graph
To make the 2 back panels:
Panel 1:
Row 1:
With soft blue, ch 55. Sc in the 2nd ch from the hook and in each ch across, turn.
Row 2:
Ch 1, sc in each st across, turn.
Rows 3-41:
Repeat row 2.
Fasten off and weave in ends.
Panel 2:
Row 1:
With soft blue, ch 55. Sc in the 2nd ch from the hook and in each ch across, turn.
Row 2:
Ch 1, sc in each st across, turn.
Rows 3-27:
Repeat row 2.
Fasten off and weave in ends.
To attach the front and back panels:
With right sides facing out, line up Panel 1 with the bottom edge of the front panel and Panel 2 with the top edge of the front panel. Panel 2 will slightly overlap Panel 1. Pin into place if necessary. Attach soft blue yarn to any corner and add 1 row of sc evenly spaced around all four sides of the pillow (placing 3 sc’s in each corner st) and sl st to beginning sc. Fasten off.
For the ruffle border:
Attach grey heather yarn and add 1 row of sc around all four sides of the pillow (placing 3 sc’s in each corner st) and sl st to beginning sc. Ch 3, work 1 dc in same st, *3dc in next st, 2 dc in next st; repeat from * around, ending with a sl st to beginning st.
Fasten off and weave in all ends. Insert pillow form.
Enjoy! If you make one I’d love to see it – you can tag me @cashmeredandelions on Instagram!

