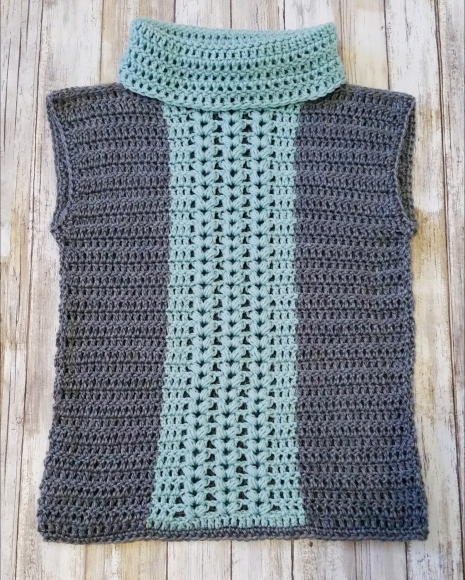
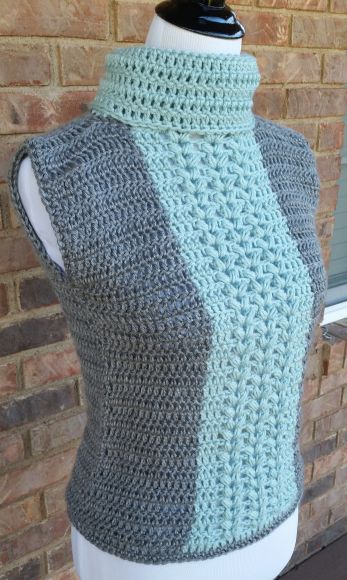
I have been seeing some beautiful patterns around the internet where one can make an easy crochet vest from two crochet rectangles. I usually avoid making or designing garments which require seaming, but this was such a simple idea I couldn’t resist trying it. Am I glad I did! This is such a fun and easy way to construct a garment.
Right away, I knew I wanted to work a v-puff stitch detail down the front of the crochet vest, then highlight that detail by using a different color for the rest of the body. I think this design is both beautiful and subtle. This pattern does not require much yarn, so it would be an excellent project to use up any #4 medium worsted weight yarn you have on hand. This crochet vest is close fitting (the one pictured is a size small displayed on a size small dress form). Size up if you would prefer a looser fit. If you do not want to finish the neckline as a turtleneck, then you can leave it open as a boat neck.
PIN for later HERE
ADD to your Ravelry que HERE
Easy Crochet Vest
Materials Used:
- Color A – Caron Simply Soft in Grey Heather (2 skeins for sizes XS – L, 3 skeins for sizes XL-3X)
- Color B – Premier Everyday Yarn in Spa (1 skein for all sizes)
- Size J/10 – 6.00 mm crochet hook
- Tapestry needle for weaving in ends
- Measuring tape or ruler
Sizes:
Bust measurement:
XS = 30″, S = 34″, M = 38″, L = 42″, XL = 46″, 2X = 50″, 3X = 54″
Length:
The length is customized by repeating rows until your panel reaches your desired length. The crochet vest pictured is 20″ long, and has 35 rows.
Abbreviations:
ch(s) = chain(s)
st(s) = stitches
dc = double crochet
hdc = half double crochet
pf = puff stitch (see description below)
sl st = slip stitch
RS = right side
WS = wrong side
American crochet terms used throughout
Special Stitch Used:
Puff Stitch:
[Yarn over and draw up a loop] 3 times, draw yarn through all 7 loops, ch 1 to close stitch.
Gauge:
4″ x 4″ = 12 dc, 7 rows
Notes:
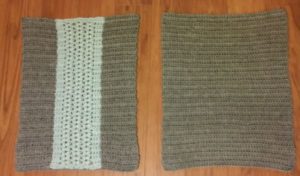
This easy crochet vest is constructed by making 2 rectangles and seaming them together along the sides and shoulders. It is designed to be close fitting. If you would like a looser or over-size sweater, you will need to size up.
The number of stitches required per size are stated in parentheses as follows: (XS, S, M, L, XL, 2X, 3X).
Instructions:
Front panel:
Row 1 (RS):
Using color A, ch (47, 53, 59, 65, 71, 77, 83). Dc in 4th ch from hook (counts as dc) and in each of next (11, 14, 17, 20, 23, 26, 29) sts, do not fasten off and drop yarn behind work. With color B, dc in each of next 21 sts, do not fasten off and drop yarn behind work. With 2nd skein of color A, dc in each of last (12, 15, 18, 21, 24, 27, 30) sts. Turn. (45, 51, 57, 63, 69, 75, 81) sts.
Row 2 (WS):
Ch 2 (does not count as dc), dc in each of the 1st (12, 15, 18, 21 24, 27, 30) sts and drop yarn in front of work. Pick up color B, dc in each of next 3 sts, skip 3 sts, [pf, ch1, pf], skip 3 sts, [pf, ch1, pf], skip 3 sts, [pf, ch1, pf], skip 3 sts, dc in each of next 3 sts and drop yarn in front of work. Pick up color A, dc in each of last (12, 15, 18, 21, 24, 27, 30) sts, turn.
Row 3 (RS):
Ch 2 (does not count as dc), dc in each of the 1st (12, 15, 18, 21 24, 27, 30) sts and drop yarn behind work. Pick up color B, dc in each of next 3 sts, skip 3 sts, [pf, ch1, pf], skip 3 sts, [pf, ch1, pf], skip 3 sts, [pf, ch1, pf], skip 3 sts, dc in each of next 3 sts and drop yarn behind work. Pick up color A, dc in each of last (12, 15, 18, 21, 24, 27, 30) sts, turn.
Repeat rows 2 and 3 until rectangle is desired length, ending on a row 2 (WS).
Final row (RS):
Ch 2 (does not count as dc), dc in each of the 1st (12, 15, 18, 21 24, 27, 30) sts and drop yarn behind work. Pick up color B, dc in each of next 3 sts, 2 hdc in the next space, 2 hdc in the space between the two puffs, 2 hdc in the next space, 3 hdc in the space between the two puffs, 2 hdc in the next space, 2 hdc in the space between the two puffs, 2 hdc in the next space, dc in each of the next 3 sts and drop yarn behind work. Pick up color A, dc in each of last (12, 15, 18, 21, 24, 27, 30) sts, turn.
Back panel:
Row 1:
Using color A, ch (47, 53, 59, 65, 71, 77, 83). Dc in 4th ch from hook (counts as dc) and in each st across, turn. (45, 51, 57, 63, 69, 75, 81) sts.
Row 2:
Ch 2 (does not count as dc), dc in each st across, turn.
Repeat row 2 until this panel is the same length as the front panel.
Assembly:
Lay the two panels on top of one another, right sides facing out. If you prefer to sew your panels together with the right side facing in, that is fine as well. Just use your preferred seaming method. (I have no idea why my second panel appears slightly larger in the photo below. It is not. I think I may have taken the photo at a weird angle. Sorry about that! Each panel should be the same size.)

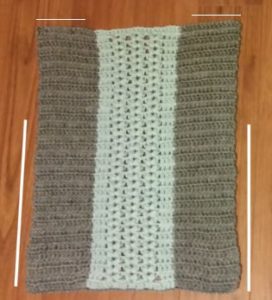
Measure (6.5″, 7″, 7.5″, 8″, 8.5″, 9″, 9.5″) down from the top. Thread needle with a length of color A and sew each side together as marked in the photo below. Fasten off.
For the shoulders, measure 2-4″ from each side. Thread needle with a length of color A and sew each shoulder together as marked in the photo below. Fasten off.

To Finish:
Armholes:
Attach color A to the bottom of each armhole and work 1 row of hdc around, sl st to beginning hdc. Fasten off.
Waistband:
Attach color A to the bottom band of the sweater and work 1 row of hdc around, sl st to beginning hdc. Fasten off.
Turtleneck:
Round 1:
Attach color B to the back middle of the neck opening. Ch 2, dc in same st, dc each st around, sl st to beginning dc.
Round 2:
Ch 2, turn work, dc in same st, dc in each st around, sl st to beginning dc.
Rounds 3-10:
Repeat row 2.
Fasten off and weave in all ends.
Enjoy! If you make an easy crochet vest of your own I’d love to see it. Just tag me @cashmeredandelions on Instagram!


I think this is so lovely and versatile for additions, my niece wants one with some crochet flowers attached to the holy panel at the front will send picks when done
That sounds beautiful! I can’t wait to see pics!